
The first time I tried making braided chocolate chip brioche recipe, my kitchen was a mess. There was flour everywhere, butter on the counters, and chocolate on the floor. But when I took the bread out of the oven, it was all worth it.
Making this braided chocolate chip brioche is more than just baking. It’s about creating a special experience. This bread turns simple ingredients into something luxurious. It fills your home with warmth and a delicious smell. Whether you’re experienced or new to baking, this recipe will help you make a beautiful bread that’s easy to make.
Key Takeaways
- Master the art of creating a delicious braided chocolate chip brioche
- Learn professional baking techniques for enriched dough
- Understand the importance of ingredient temperatures and proportions
- Discover how to achieve perfect texture and flavor
- Gain confidence in handling yeasted bread recipes
Introduction to Braided Chocolate Chip Brioche
Exploring brioche pastry baking is like starting a tasty journey. French brioche baking has won the hearts of many for years. It’s a mix of flavors and traditions.
I love this recipe because it’s both cozy and fancy. Inspired by classic French methods, this braided chocolate chip brioche is more than a treat. It’s a tribute to cooking skill.
Why I Love This Recipe
This brioche stands out for several reasons:
- It has a rich, buttery taste that’s irresistible
- It’s filled with chocolate chips for extra sweetness
- The braided look is stunning and impressive
- It’s great for any time of day, whether it’s breakfast or dessert
A Brief History of Brioche
Brioche comes from France and has a rich history. This fancy bread started in the medieval times. It was only for the rich because of its high butter content.
| Century | Brioche Development |
|---|---|
| 14th Century | First written records of brioche appear |
| 16th Century | Becomes popular among French aristocracy |
| 19th Century | Spreads to wider population as butter becomes more accessible |
“Brioche is not just bread, it’s a delicate art form that connects us to centuries of culinary tradition.” – Renowned French Baker
Knowing the history of French brioche baking makes every bite special.
Print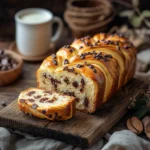
Easiest Braided Chocolate Chip Brioche Recipe
- Total Time: 4 hours (including rising)
- Yield: 1 loaf (8-10 slices)
Description
A soft and buttery homemade brioche, braided and filled with chocolate chips for a delightful bakery-style treat!
Ingredients
Dough:
• 3 ½ cups all-purpose flour
• ¼ cup granulated sugar
• 1 packet (2 ¼ tsp) active dry yeast
• ½ cup warm milk (110°F)
• 3 large eggs
• 1 tsp salt
• 1 tsp vanilla extract
• 10 tbsp unsalted butter, softened
• ¾ cup chocolate chips
Egg Wash:
• 1 egg
• 1 tbsp milk
Instructions
1. Activate yeast in warm milk with 1 tsp sugar.
2. Mix flour, sugar, and salt. Add eggs, vanilla, and yeast mixture.
3. Incorporate butter gradually, kneading until smooth.
4. Fold in chocolate chips, cover, and let rise for 2 hours.
5. Divide dough into three ropes, braid, and let rise for another hour.
6. Brush with egg wash and bake at 350°F for 25-30 minutes.
7. Cool slightly before serving.
Notes
• Use bread flour for a chewier texture.
• Substitute dark chocolate for a richer flavor.
• Best enjoyed warm or toasted with butter.
- Prep Time: 20 minutes
- Cook Time: 30 minutes
- Category: Bread, Dessert
- Method: Baking
- Cuisine: French
Nutrition
- Serving Size: 1 slice
- Calories: 320 kcal
- Sugar: 12g
- Sodium: 180mg
- Fat: 14g
- Saturated Fat: 8g
- Unsaturated Fat: 5g
- Trans Fat: 0g
- Carbohydrates: 42g
- Fiber: 2g
- Protein: 7g
- Cholesterol: 75mg
Keywords: chocolate chip brioche, braided bread, homemade French bread, bakery-style brioche
Ingredients Needed for the Brioche
Starting a sweet yeast dough recipe means picking the right ingredients. I’ve learned that quality beats quantity when making buttery brioche rolls.

Let’s look at what makes this brioche special. Precision is key when you’re gathering your ingredients.
Essential Ingredients for Brioche Dough
- 4 cups all-purpose flour
- 6 large eggs
- 1 cup unsalted butter
- 3 teaspoons instant yeast
- 4 tablespoons sugar
- 2 teaspoons salt
- 1 teaspoon vanilla extract
Optional Add-ins for Extra Flavor
While the basic ingredients are great, I love adding extra flavors. Chocolate chips are my favorite, but you can try other mix-ins too.
- Dark chocolate chunks
- Orange zest
- Cinnamon
- Dried fruits
For the best buttery brioche rolls, use high-quality ingredients. The little details make a big difference.
“Great baking is about passion, precision, and the right ingredients.”
Pro tip: Make sure all ingredients are at room temperature before mixing. This makes the dough smoother and the rolls softer. You’ll be proud to serve them.
Preparing the Dough Step by Step
Making the perfect homemade brioche bread begins with mixing and kneading. I’ll guide you through each step to help your brioche look great.
Essential Mixing Techniques
When making your brioche, being precise is important. Use a stand mixer with a dough hook for an easier process. Begin by warming milk to 110°F (43°C) to activate the yeast.
The milk’s temperature is vital. If it’s too hot, it kills the yeast. If it’s too cold, the yeast won’t activate right.
- Combine warm milk (110°F) with 2¼ tsp active dry yeast
- Add ⅓ cup granulated sugar to feed the yeast
- Mix in 3 large eggs for richness
- Gradually incorporate 4 cups of bread flour
Mastering the Kneading Process
Kneading is where the magic happens. It takes patience to develop gluten. Mix until you have a shaggy dough, then knead for about 10-15 minutes.
The dough should be smooth and elastic. It should spring back when touched.
“Great bread is all about technique and patience.” – Artisan Baker’s Wisdom
When your dough is ready, add ¾ cup of softened unsalted butter slowly. This makes the brioche rich and tender.
Pro tip: The dough should feel tacky but not stick to your hands. If it’s too wet, add a little more flour. If too dry, a splash of milk can help.
First Rise: What to Expect
During the first rise, magic happens in your dough. This stage turns simple ingredients into a rich, flavorful base for your French brioche.

The first rise usually takes 1 to 1.5 hours. Your dough will change a lot. It should double in size, becoming light and airy, just like great brioche.
How to Know When It’s Ready
To check if your brioche dough is ready, try these simple methods:
- The “Poke Test”: Gently press your finger into the dough
- If the indentation remains, your dough is ready
- If the dough springs back immediately, it needs more time
Tips for Great Results
Creating the perfect environment for your dough’s first rise is key. Look for a warm, draft-free spot in your kitchen. A temperature between 75-80°F is best for yeast activity.
“The first rise is where flavor develops and texture begins” – Baking Wisdom
| Rise Characteristic | Ideal Condition |
|---|---|
| Duration | 1-1.5 hours |
| Temperature | 75-80°F |
| Volume Increase | Approximately Double |
| Dough Texture | Soft, Puffy, Elastic |
By focusing on these details, you’ll become a pro at brioche pastry baking. You’ll make a French-style bread that will wow even the pickiest bakers.
Shaping the Brioche
Making a beautiful braided bread loaf is an art. It turns simple ingredients into a stunning chocolate brioche twist. The shaping process lets your creativity shine, turning dough into an elegant masterpiece.
Mastering Braiding Techniques
I’ll guide you through braiding a perfect brioche. Start by dividing the dough into three equal pieces. Roll each into smooth ropes. Before braiding, add chocolate chips for an even spread.
- Divide dough into 3 equal portions
- Roll each portion into long, even ropes
- Pinch the top ends together
- Cross ropes alternately from outside to center
- Seal the bottom ends firmly
Creating the Perfect Shape
The secret to a stunning chocolate brioche twist is in the braiding. Keep the ropes even and braid gently. Gentle handling preserves the delicate texture of your brioche.
“A well-braided loaf is a work of art that begins with patience and precision.” – Professional Baker’s Wisdom
When you finish braiding, tuck the ends under for a smooth look. This ensures your braided bread loaf is as delightful as it tastes.
Second Rise: Preparing for Baking
After shaping your homemade brioche bread, the second rise is key. It turns your dough into a light, airy masterpiece. This will make your taste buds happy.

Your brioche dough needs the right environment for this stage. Create a space that lets it expand gently without getting too big.
Timing and Temperature Secrets
The second rise should last 45 minutes to 1 hour. Keep the temperature between 75-80°F. I use my kitchen’s warmest spot near the oven for best results.
- Keep dough covered with a clean kitchen towel
- Check volume expansion every 15 minutes
- Ensure room temperature remains consistent
Avoiding Common Proofing Mistakes
Watch your dough carefully! Overproofing can ruin your brioche. It might collapse or taste yeasty. Look for these signs of perfect proofing:
- Slight jiggle when gently shaken
- Puffy appearance
- Soft, pillowy texture
“Patience is the secret ingredient in perfect brioche.” – Professional Baker’s Wisdom
Mastering the second rise will make your brioche as good as a bakery’s. Your homemade brioche will show off your baking talent!
Baking the Braided Chocolate Chip Brioche
Baking your braided chocolate chip brioche is truly magical. You’ve prepared the dough with traditional French brioche techniques. Now, you’re about to turn it into a golden, delicious masterpiece.
Perfect Oven Settings for Your Brioche
When baking this braided chocolate chip brioche, precision is key. Set your oven to 375°F (190°C). This temperature is perfect for a beautiful golden crust and a well-baked interior. Place the rack in the oven’s center for even heat.
- Preheat oven to 375°F (190°C)
- Use center oven rack
- Bake for 20-25 minutes
Visual Cues for a Perfect Bake
Knowing when your brioche is perfectly baked requires keen observation. Look for these signs during your French brioche baking journey:
- Color: A rich, deep golden-brown surface
- Texture: Slightly crisp exterior with a soft, pillowy interior
- Chocolate chips: Melted but not burned
“The perfect brioche is a delicate balance of golden crust and tender crumb.” – Artisan Baker’s Wisdom
Before baking, brush the brioche with an egg wash. This will give it a shiny, rich color that looks professionally baked.
Pro tip: If the top browns too quickly, cover with aluminum foil. This prevents burning while ensuring the inside cooks well.
Cooling and Storing the Brioche
After baking your homemade brioche bread, it’s important to cool and store it right. This keeps its flavor and texture amazing. How you handle your brioche rolls after baking greatly affects their quality.
Best Cooling Practices
Cooling your brioche needs patience and the right method. Take it out of the oven and let it rest on the baking sheet for 5-10 minutes. This helps the bread set and avoids damage.
- Transfer to a wire rack after initial resting
- Allow complete cooling for at least 30 minutes
- Avoid cutting into the bread too quickly
Storage Methods for Maximum Freshness
Storing your homemade brioche bread right is key to enjoying it for days. Here’s a guide on how to store it:
| Storage Location | Duration | Preservation Tips |
|---|---|---|
| Room Temperature | 2-3 days | Use airtight container |
| Refrigerator | 5-7 days | Wrap in plastic wrap |
| Freezer | 2-3 months | Use freezer bag, wrap tightly |
“The secret to great brioche is not just in baking, but in how you store and preserve it.” – Baking Expert
Freezing your brioche rolls? Make sure they’re cool first. To reheat, wrap in foil and warm at 400°F for 6-8 minutes.

Pro tip: Always store your homemade brioche bread at room temperature first, and only refrigerate or freeze if you won’t consume it within 2-3 days.
Serving Suggestions for the Brioche
After making your chocolate brioche twist, the fun starts. You get to find the best ways to enjoy this tasty treat. I love sharing it with friends and family, trying out new ways to serve it.
Delightful Pairing Ideas
These buttery brioche rolls are perfect for breakfast or brunch. Here are some great pairings:
- Freshly brewed coffee
- Herbal or black tea
- Warm vanilla latte
- Fresh fruit compote
My Personal Serving Favorites
I like to turn my brioche into decadent French toast. Slice it, dip in eggs and milk, then fry until golden. Add powdered sugar or maple syrup for a sweet start.
“A great brioche is like a warm hug for your taste buds!” – My baking mantra
For big events, I serve my chocolate brioche twist as dessert. It’s great with vanilla ice cream or whipped cream. The chocolate chips melt, making it a rich, indulgent treat.
Troubleshooting Common Issues
Every homemade brioche bread adventure comes with challenges. Understanding common baking problems can make your brioche-making experience better.

When Your Dough Refuses to Rise
Yeast can be tricky in brioche pastry baking. If your dough isn’t rising, check these key factors:
- Verify your yeast’s freshness – expired yeast won’t activate
- Ensure water temperature is between 100-110°F
- Create a warm, draft-free environment for proofing
I recommend using SAF Gold Instant Yeast. It works great with high-sugar doughs like brioche.
Rescuing an Overbaked Brioche
Overbaking can ruin your beautiful homemade brioche bread. Here’s how to rescue it:
| Overbaking Symptom | Rescue Technique |
|---|---|
| Slightly Dry Surface | Brush with simple syrup or melted butter |
| Very Dry Texture | Transform into bread pudding or French toast |
| Tough Crust | Slice thinly and toast, serve with spreads |
“Baking is a journey of patience and practice” – My grandmother’s wisdom rings true in every brioche attempt.
Even professional bakers face challenges. The key is to learn and adapt with each bake.
Variations of the Braided Brioche
Once you’ve mastered the classic chocolate chip brioche twist, it’s time to try new flavors. This sweet yeast dough recipe is perfect for experimenting. You can keep the brioche texture the same while trying different tastes.
Chocolate Chip Combinations to Explore
Mixing different chocolates is my favorite way to change up the chocolate brioche twist. Here are some tasty mixes:
- Dark and white chocolate chips
- Milk chocolate with caramel chunks
- Semi-sweet chocolate with crushed hazelnuts
- Mint chocolate chips
Seasonal Twists on the Classic Recipe
Seasonal flavors can easily be added to your sweet yeast dough recipe. I love making my chocolate brioche twist special for each season:
| Season | Flavor Twist |
|---|---|
| Fall | Pumpkin spice chocolate chips |
| Winter | Peppermint chocolate chunks |
| Spring | Strawberry chocolate swirls |
| Summer | Coconut chocolate chips |
Each twist adds a new flavor to the classic chocolate brioche. This keeps your baking exciting and tasty. So, don’t be shy to try new things!
“Baking is an art, and your brioche is the canvas.”
Conclusion: Enjoying My Homemade Brioche
Baking this braided chocolate chip brioche recipe has been amazing. It’s taught me so much about cooking. From measuring the flour to braiding the dough, every step has been special.
It’s made me love baking even more. Working with butter, chocolate chips, and yeast has shown me baking is both art and science. Every time I cut into the loaf, I feel joy at making something tasty from scratch.
Reflecting on the Baking Journey
Learning to make this brioche was more than just following a recipe. It was about understanding dough, temperature, and technique. Turning simple ingredients into a beautiful loaf is truly magical. This recipe is perfect for both experienced bakers and beginners looking to try something new.
Encouragement to Try It Yourself
I encourage you to start your own bread baking journey. Don’t worry if it’s hard at first—each try brings new skills and tasty results. With practice, you’ll make a stunning brioche that will wow everyone. The most important thing is the love you put into your baking.